

Visualization#
EvalScope provides a web-based visualization tool that supports in-depth analysis and comparison of evaluation results for single or multiple models, compatible with mixed dataset evaluation display, and supports online evaluation task submission and monitoring.
Important
This visualization tool is specifically designed for displaying model evaluation results and is not suitable for model stress test results. For visualizing stress test reports, please refer to the Stress Test Result Visualization Guide.
Installation and Startup#
1. Install Dependencies#
Install the required dependencies for visualization:
pip install 'evalscope[service]' -U
Note
The visualization feature requires evaluation reports generated by evalscope>=0.10.0. If your version is too old, please upgrade first and re-run the evaluation.
2. Start Service#
Run the following command to start the visualization web service:
evalscope service
After the service starts, open the Dashboard URL printed on startup (default: http://127.0.0.1:9000) in your browser to access it.
Supported command line parameters:
--host: Server listening address, default is0.0.0.0.--port: Server port, default is9000.--outputs: Specify the root directory where evaluation reports are located, default is./outputs.--debug: Enable debug mode.
3. Interface Settings#
The top navigation bar of the web interface provides the following quick actions:
Language Switch: Click the language button to switch between Chinese and English interface languages.
Theme Switch: Click the sun/moon icon to switch between light mode and dark mode.
Quick Experience#
We provide an evaluation sample containing multiple models and datasets to help you quickly experience the visualization features:
git clone https://github.com/modelscope/evalscope
evalscope service --outputs examples/viz
This sample contains evaluation results of qwen-plus and qwen3-max models on GSM8K, GPQA, IFEval, iQuiz and other datasets.
Feature Introduction#
Dashboard#
The dashboard is the homepage of the visualization tool, providing a macro overview of evaluation results.
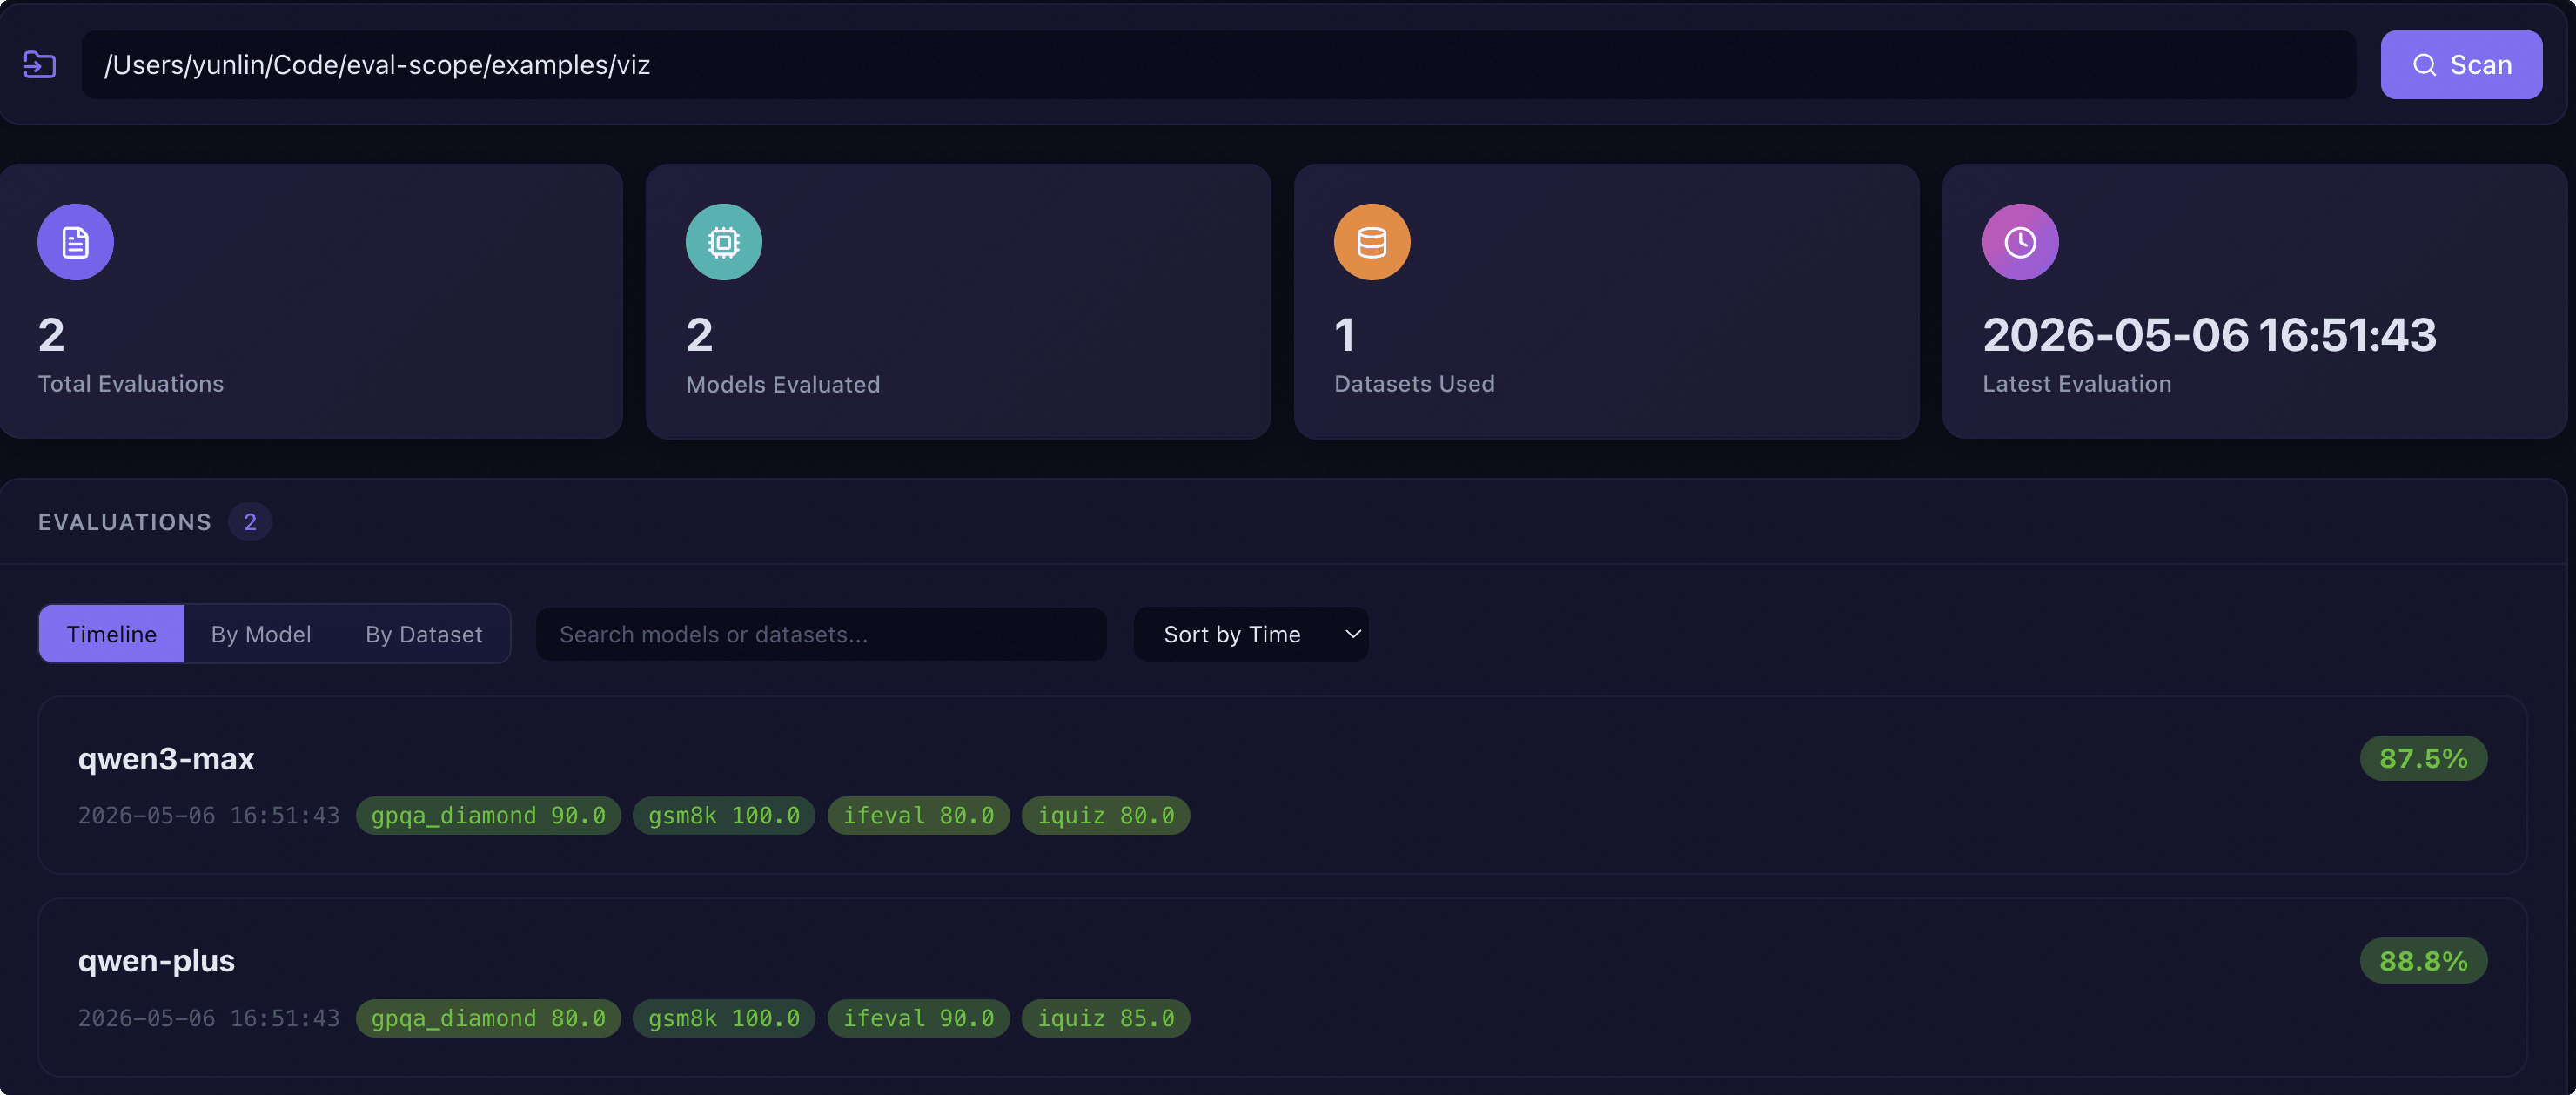
Directory Scan: Enter the root directory where evaluation reports are located in the path bar at the top of the page, and click the scan button to automatically discover all evaluation reports in that directory.
KPI Cards: After scanning, four key metric cards are displayed:
Total Evaluations: The number of discovered evaluation reports. Click to switch to timeline view.
Models Evaluated: The number of different models involved. Click to switch to group by model view.
Datasets: The number of different datasets involved. Click to switch to group by dataset view.
Latest Evaluation: The timestamp of the most recent evaluation. Click to jump to that report details.
Evaluation List: Supports three view mode switches:
Timeline View: Displays each evaluation record in chronological order, with each card showing model name, overall score, timestamp, and dataset score tags.
Group by Model: Folds evaluation records by model name, displaying the best score and evaluation count for each group.
Group by Dataset: Folds evaluation records by dataset name, displaying the best score and evaluation count for each group.
Additionally, the list area provides a search box (search by model name or dataset name) and sorting options (sort by time, score, or model name).
Evaluation Report List#
The report list page provides more refined report management and filtering capabilities, supporting multi-select reports for comparative analysis.
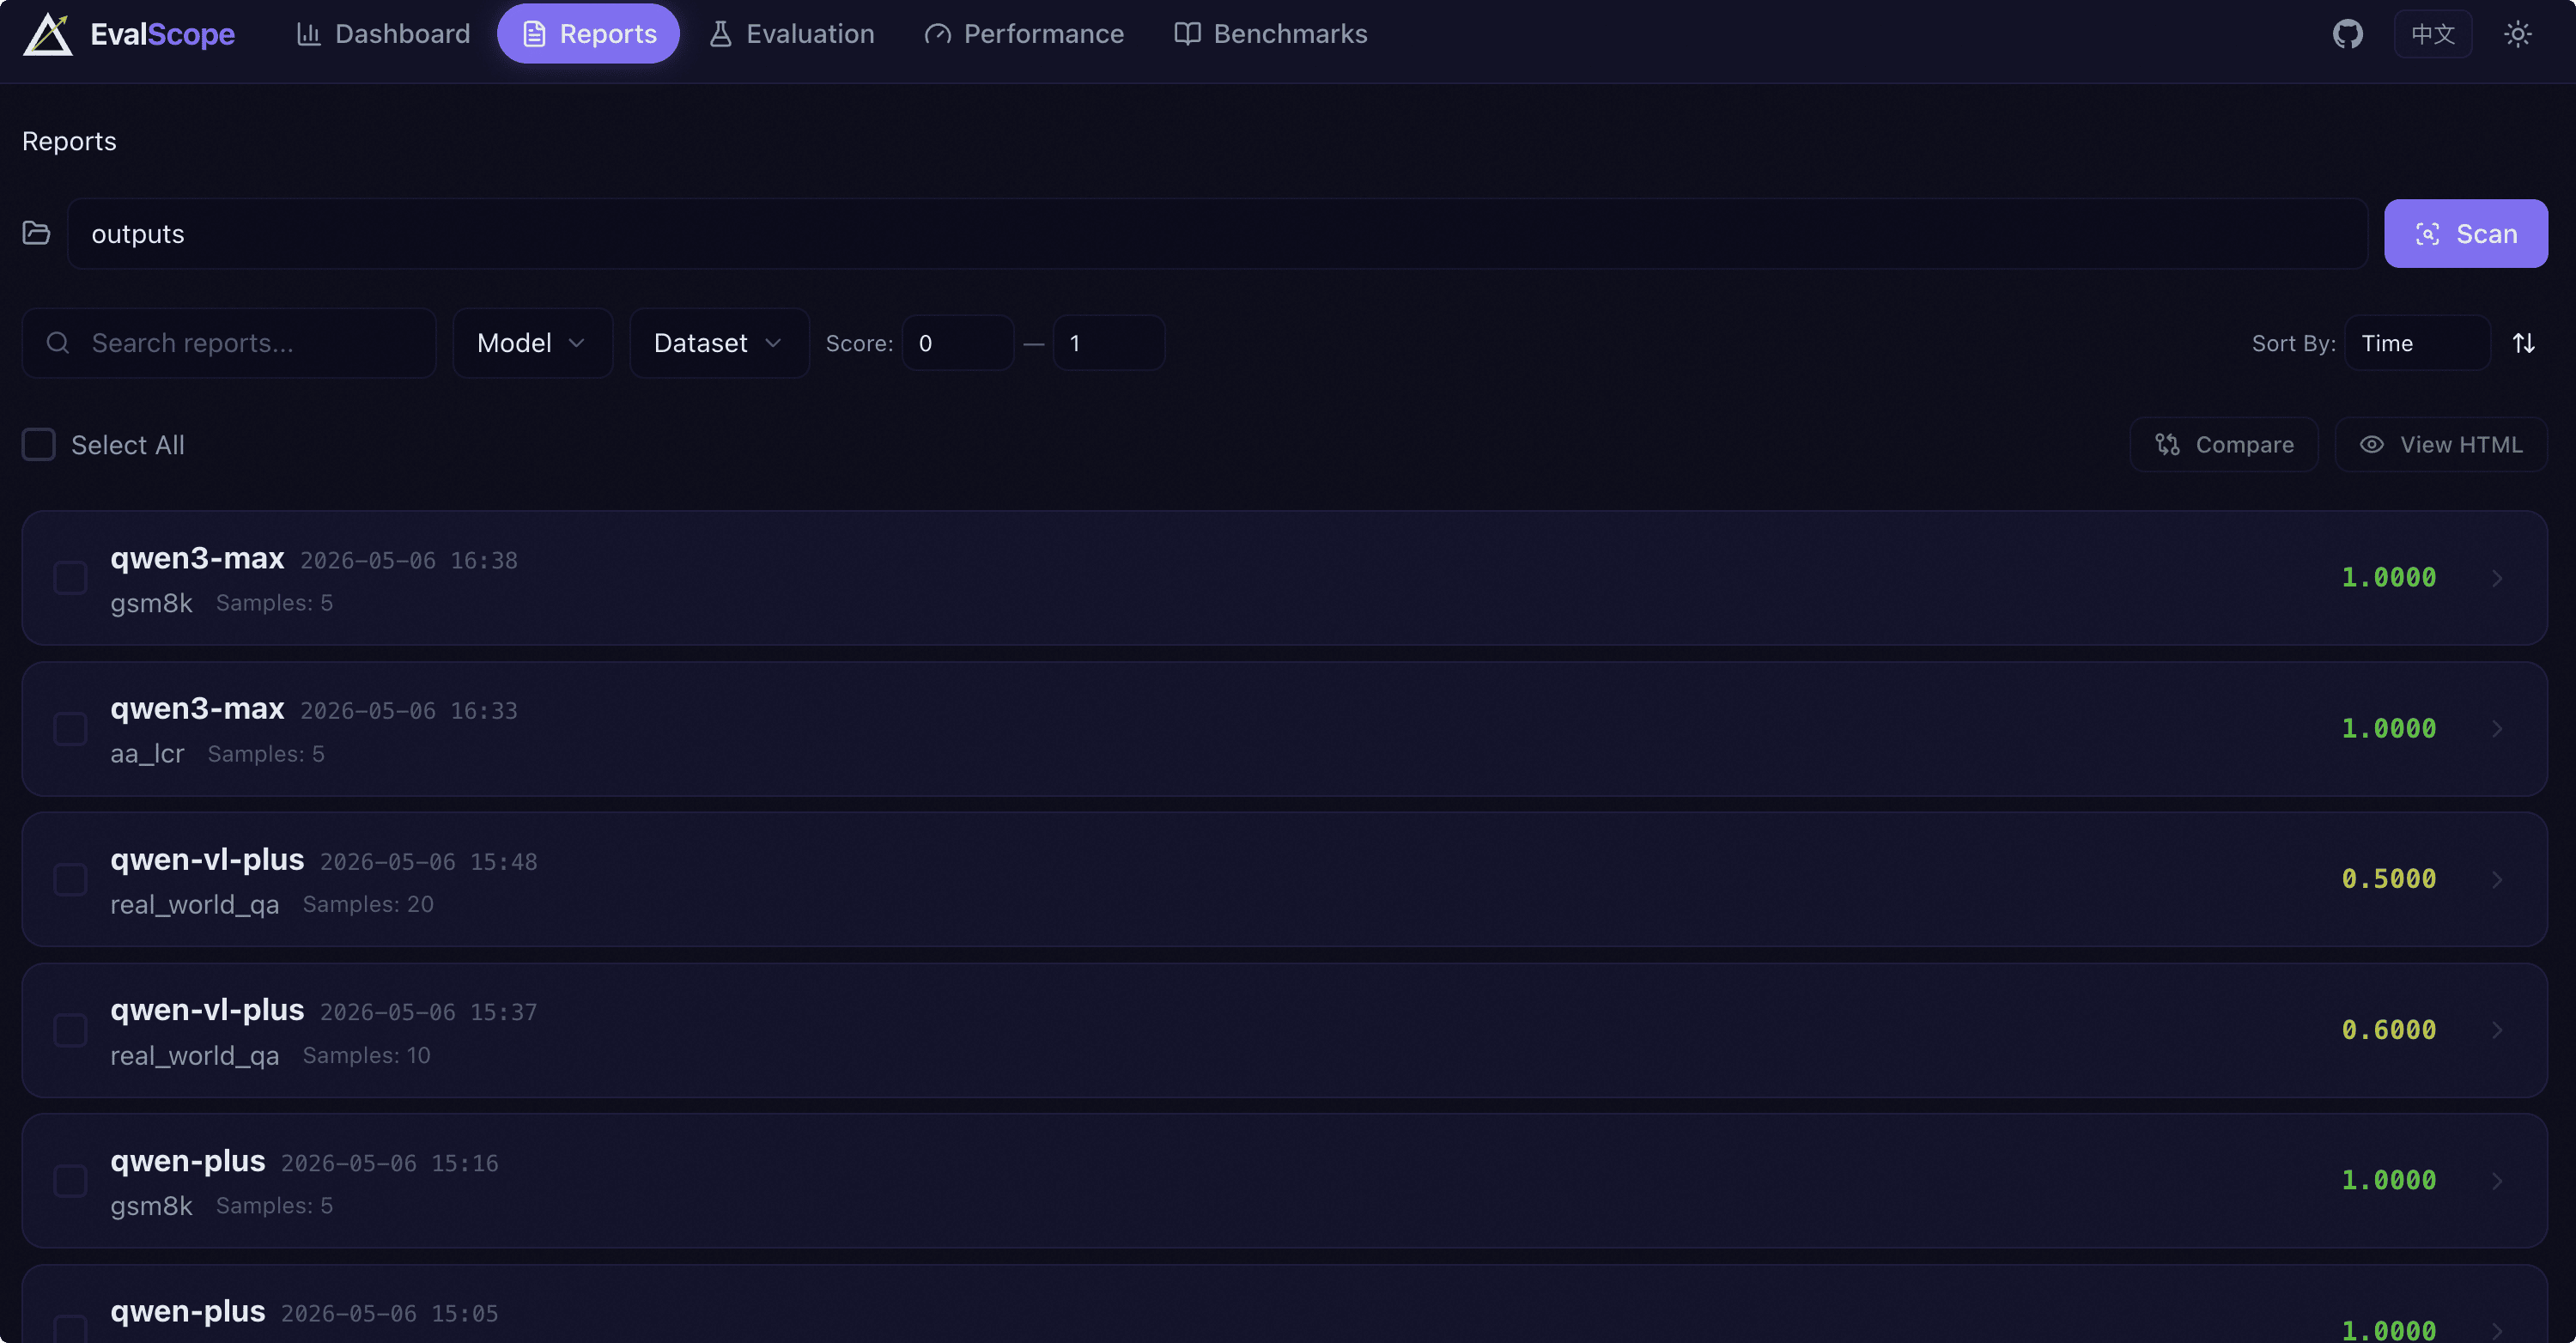
Filter Conditions: The following filter dimensions are provided:
Keyword Search: Fuzzy search by report name.
Model Filter: Multi-select dropdown to filter by model name.
Dataset Filter: Multi-select dropdown to filter by dataset name.
Score Range: Set minimum and maximum score intervals.
Sort By: Sort by time, score, model name, or dataset name, with ascending/descending toggle.
Multi-select and Compare: Each report card has a checkbox on the left. After selecting, you can perform the following actions:
Compare: After selecting 2-3 reports, click the compare button to enter the multi-model comparison page.
View HTML Report: After selecting 1 report, you can open the HTML version of the report in a new browser tab.
Pagination: The report list supports paginated browsing, displaying 20 records per page.
Single Model Evaluation Details#
Click any evaluation report to enter the details page and view a single model’s detailed performance on each dataset. The details page consists of a report header, dataset navigation, and three functional tabs.
Overview Tab#
The report header displays the model name, associated dataset list (clickable to switch), overall score and total sample count, and provides quick buttons to view the HTML report and return to the list.
The overview tab provides a summary of the model’s overall performance on each dataset:
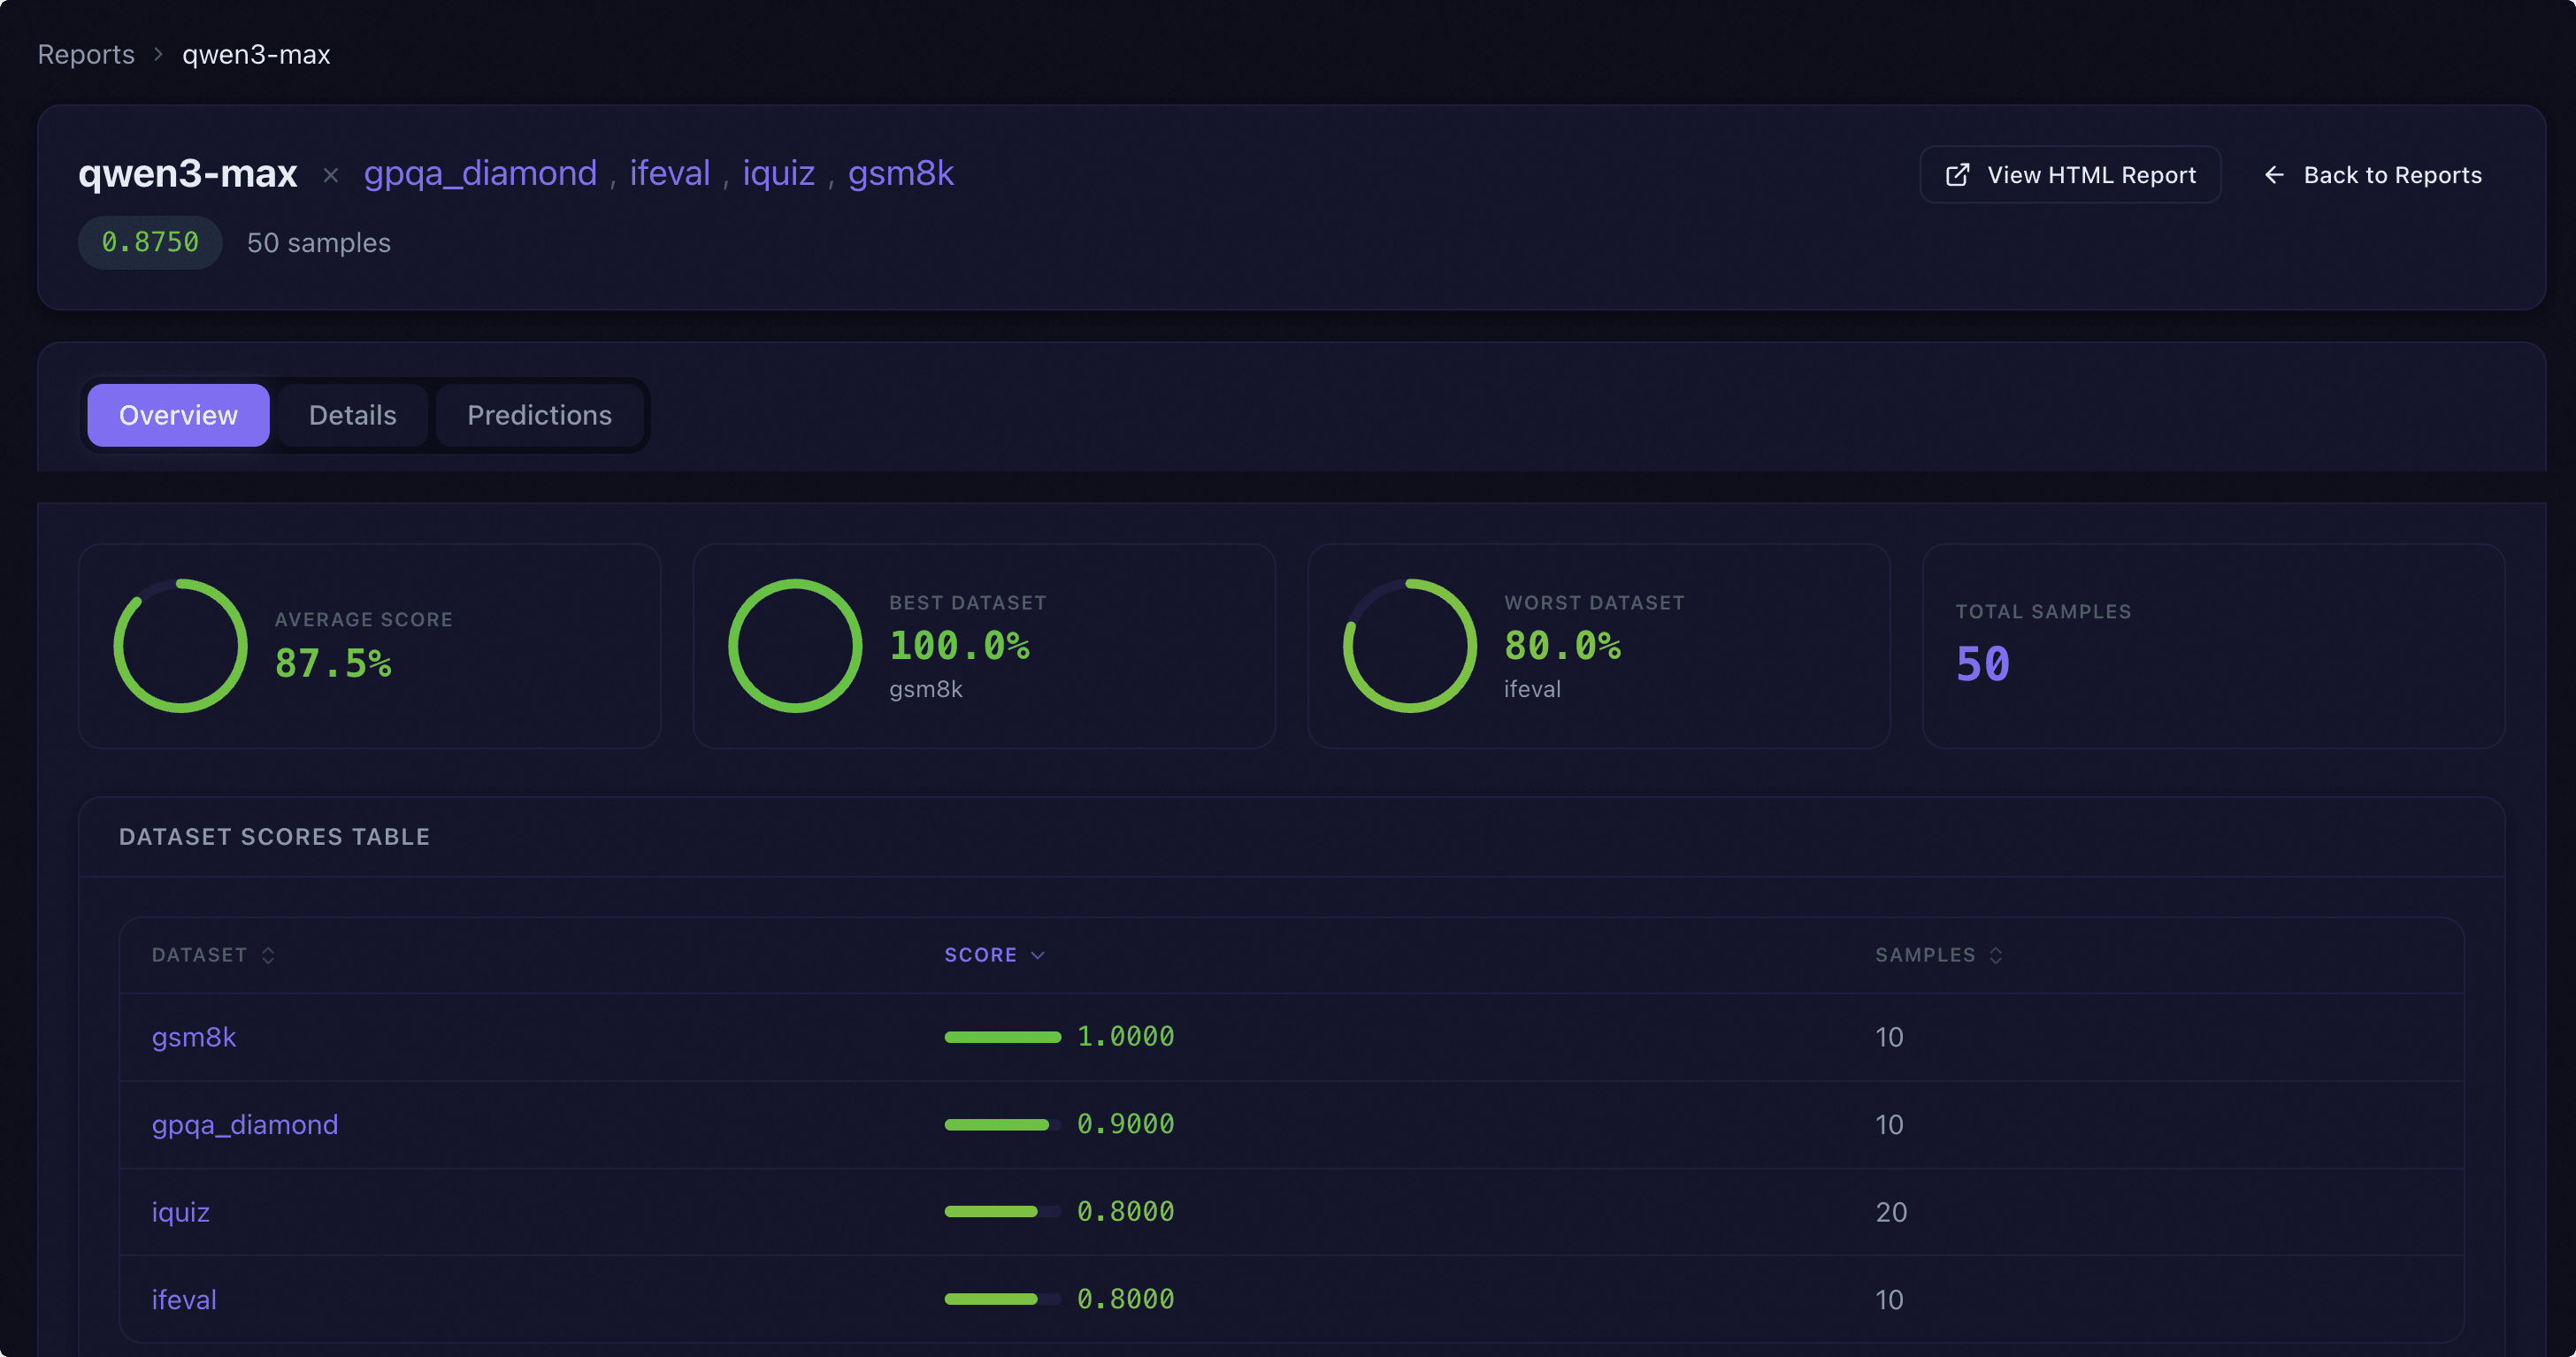
Statistics Overview: Displays average score, best/worst dataset and their scores, and total sample count using ring progress charts and number cards.
Dataset Score Table: A sortable table listing each dataset’s name, score (with progress bar and value), and sample count. Click the dataset name to jump to the dataset’s details tab.
Radar Chart: Intuitively displays the model’s capability dimension distribution across datasets using a radar chart.
Task Configuration: A collapsible area that displays the evaluation task configuration information using a JSON viewer.
Details Tab#
The details tab provides an in-depth view of the selected dataset’s subset scores and analysis results:
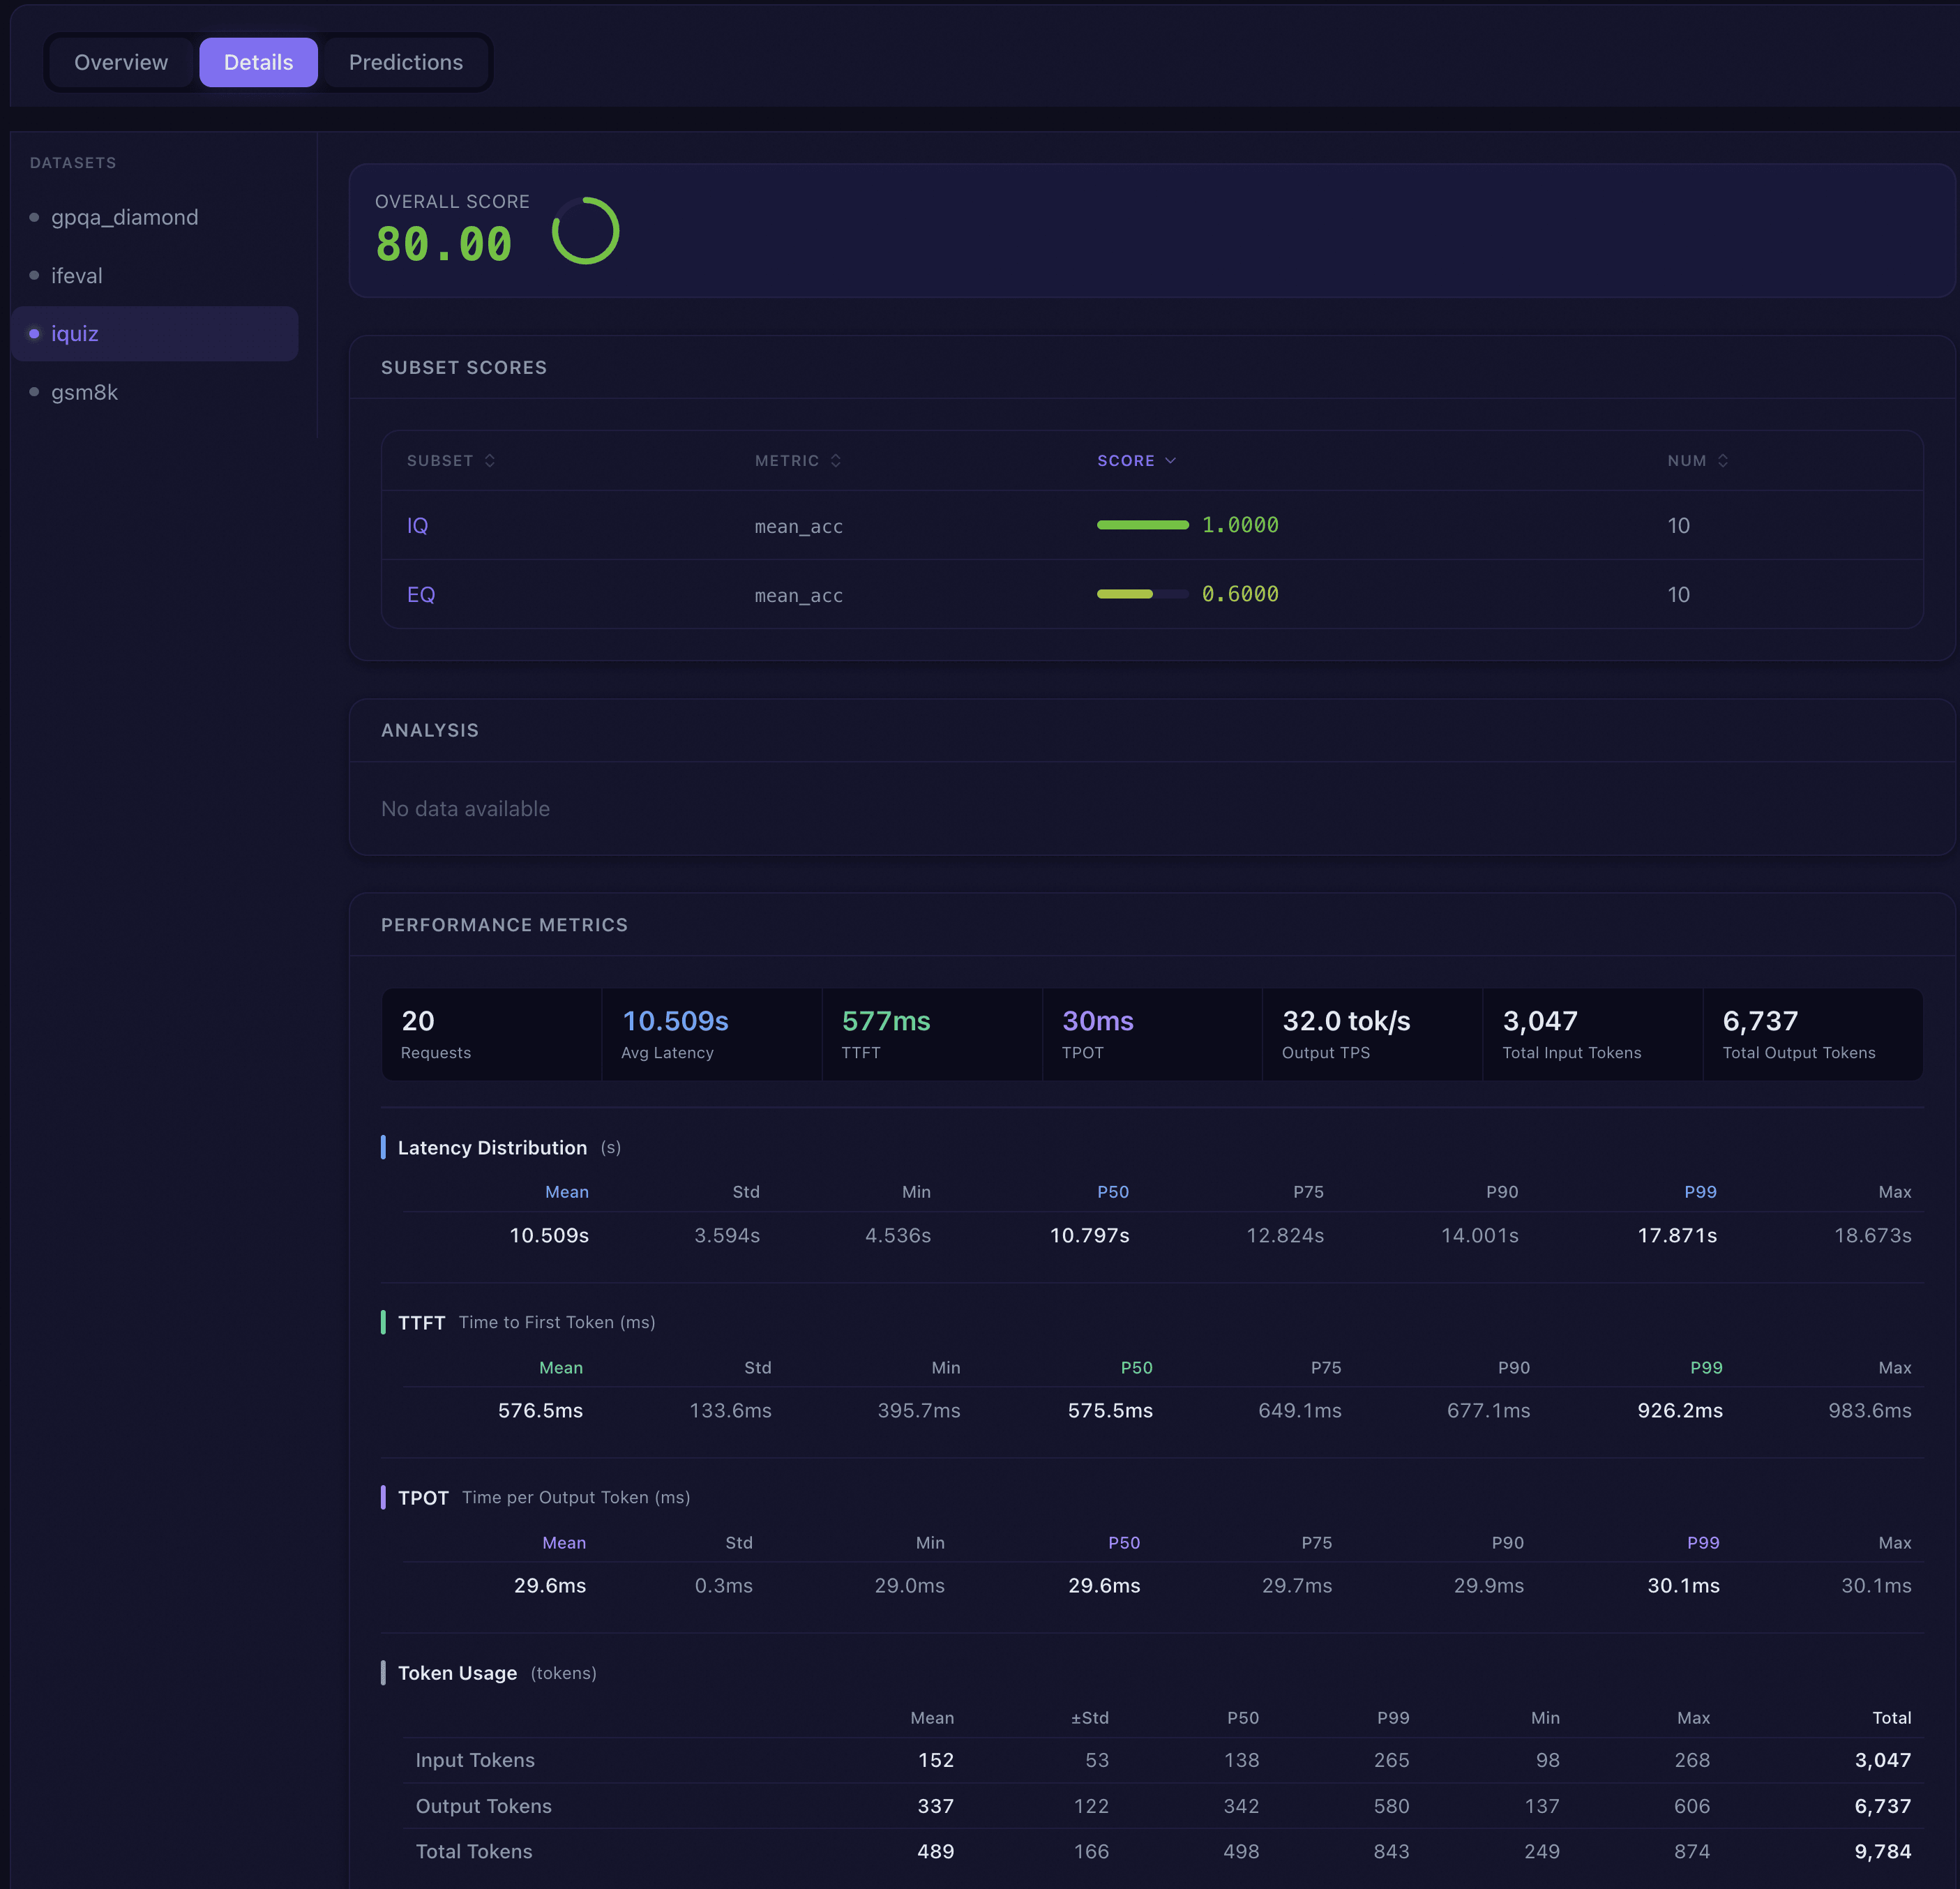
Overall Score: Displays the dataset’s overall score using a large number and ring progress chart.
Subset Score Table: A sortable table listing each subset’s name, metric (if applicable), score, and sample count. Click the subset name to jump directly to the sample browsing for that subset in the predictions tab.
AI Analysis: An intelligent analysis report rendered in Markdown format, interpreting the model’s performance on this dataset.
Performance Metrics: When the evaluation includes performance data, displays latency distribution (with percentile table), TTFT (Time to First Token), TPOT (Time per Output Token), and token usage statistics.
Predictions Tab#
The predictions tab allows browsing each sample’s detailed prediction results one by one, and is the most fine-grained analysis tool:

Filter and Navigation:
Subset Selector: Dropdown to select the subset of the current dataset.
Score Threshold: Set the pass/fail score threshold, default 0.99.
Pass Status Filter: All / Pass / Fail buttons for quick sample filtering, each button displaying the corresponding count.
Sample Search: Supports precise search and jump by sample index number (Index) and message ID (Message ID).
Sample Pagination: Left/right arrow buttons or keyboard arrow keys to browse one by one, displaying current page number and total pages.
Conversation View: Each sample is displayed in chat bubble format, supporting the following content types:
System Prompt: A collapsible top banner displaying the System Prompt content.
User Message: Blue bubble, supporting text, images (click to enlarge), audio and other rich media content. Round labels are displayed for multi-turn conversations.
Assistant Reply: Green bubble, supporting text, reasoning process (collapsible), tool calls (collapsible), and performance metrics. Round labels are displayed for multi-turn conversations.
Tool Result: A collapsible tool return result area.
Message ID: Each message displays a copyable message ID tag in the upper right corner.
Content Copy: Each message provides a one-click copy button.
Evaluation Result Panel: Below the conversation view, evaluation judgment details are displayed:
Extracted Answer: The predicted answer extracted from the model output (displayed when different from the generated content).
Gold Answer: The expected correct answer.
Score: Numerical score and pass/fail indicator.
Scoring Details: A collapsible JSON view showing the complete information of the score calculation.
Metadata: A collapsible JSON view showing the sample’s additional metadata.
Tip
When Agent Evaluation is enabled, the predictions view automatically detects the sample’s agent_trace and renders an Agent Trace view grouped by step (with tool calls, environment commands, nudges, errors, etc.). See Agent Evaluation → Trace Visualization for the full description and a screenshot.
Multi-Model Comparison#
After selecting 2-3 reports on the report list page, click the “Compare” button to enter the multi-model comparison page. The comparison page supports side-by-side comparison analysis of up to 3 models.
Score Comparison#
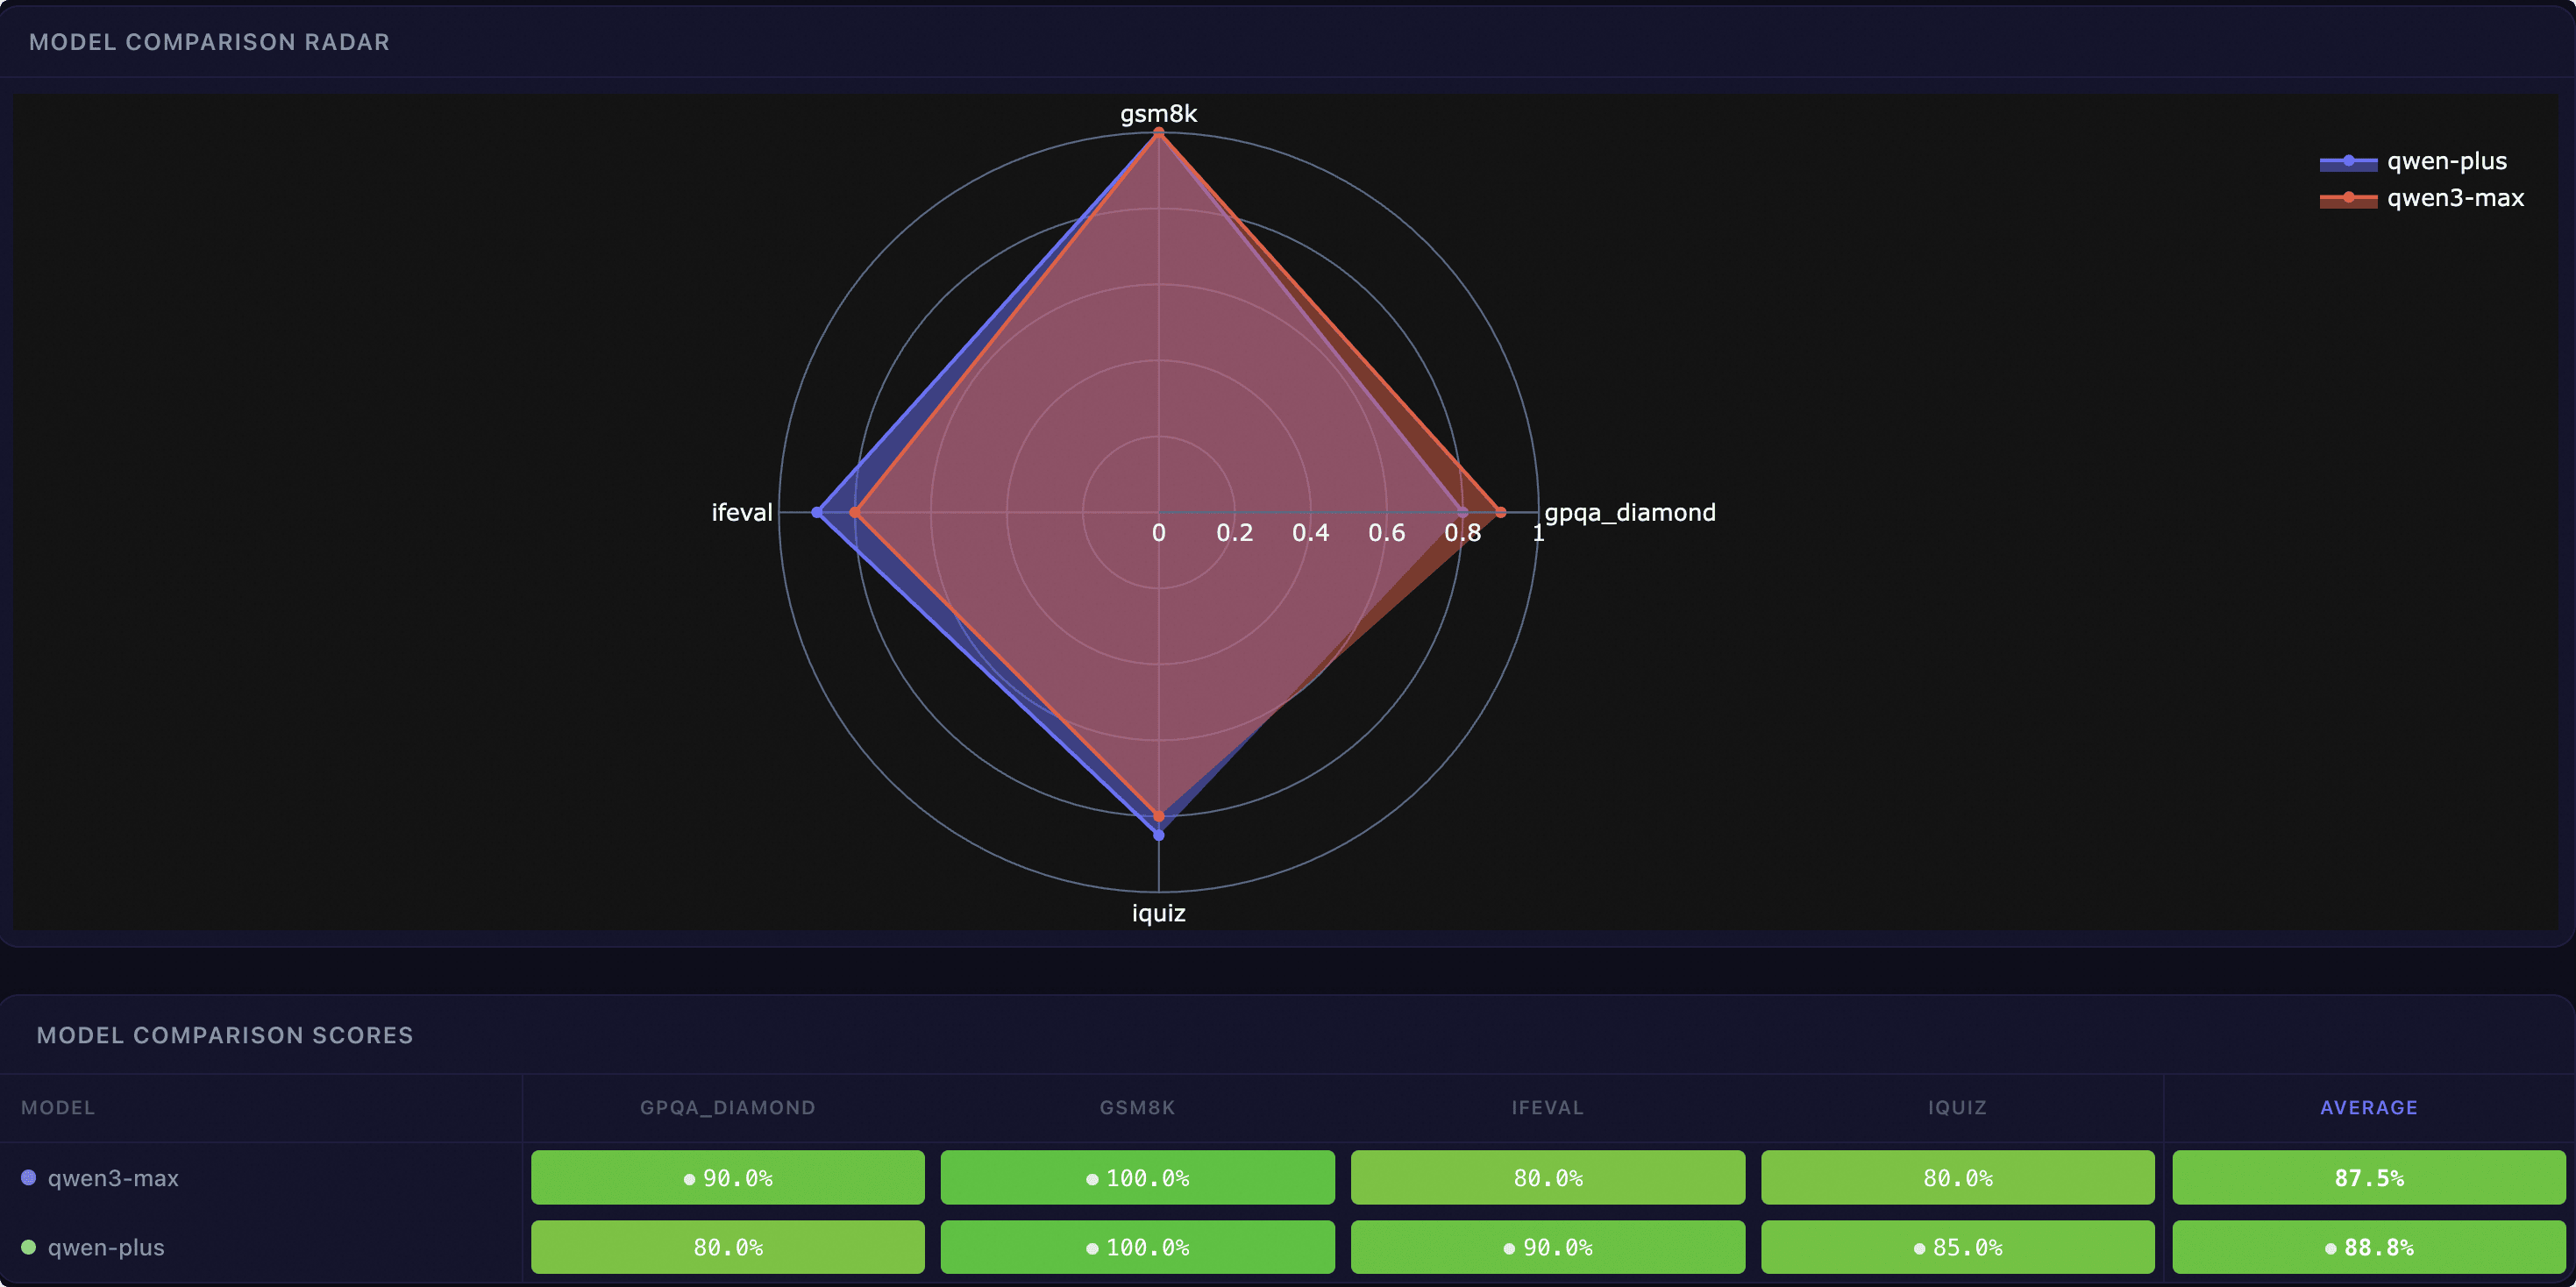
Radar Chart: Intuitively displays each model’s capability dimension comparison across different datasets using a polygon radar chart.
Score Comparison Table: A table with datasets as rows and models as columns, each cell displaying the score percentage with color coding, and the highest score highlighted. The bottom of the table calculates the average score for each model.
Prediction Comparison#
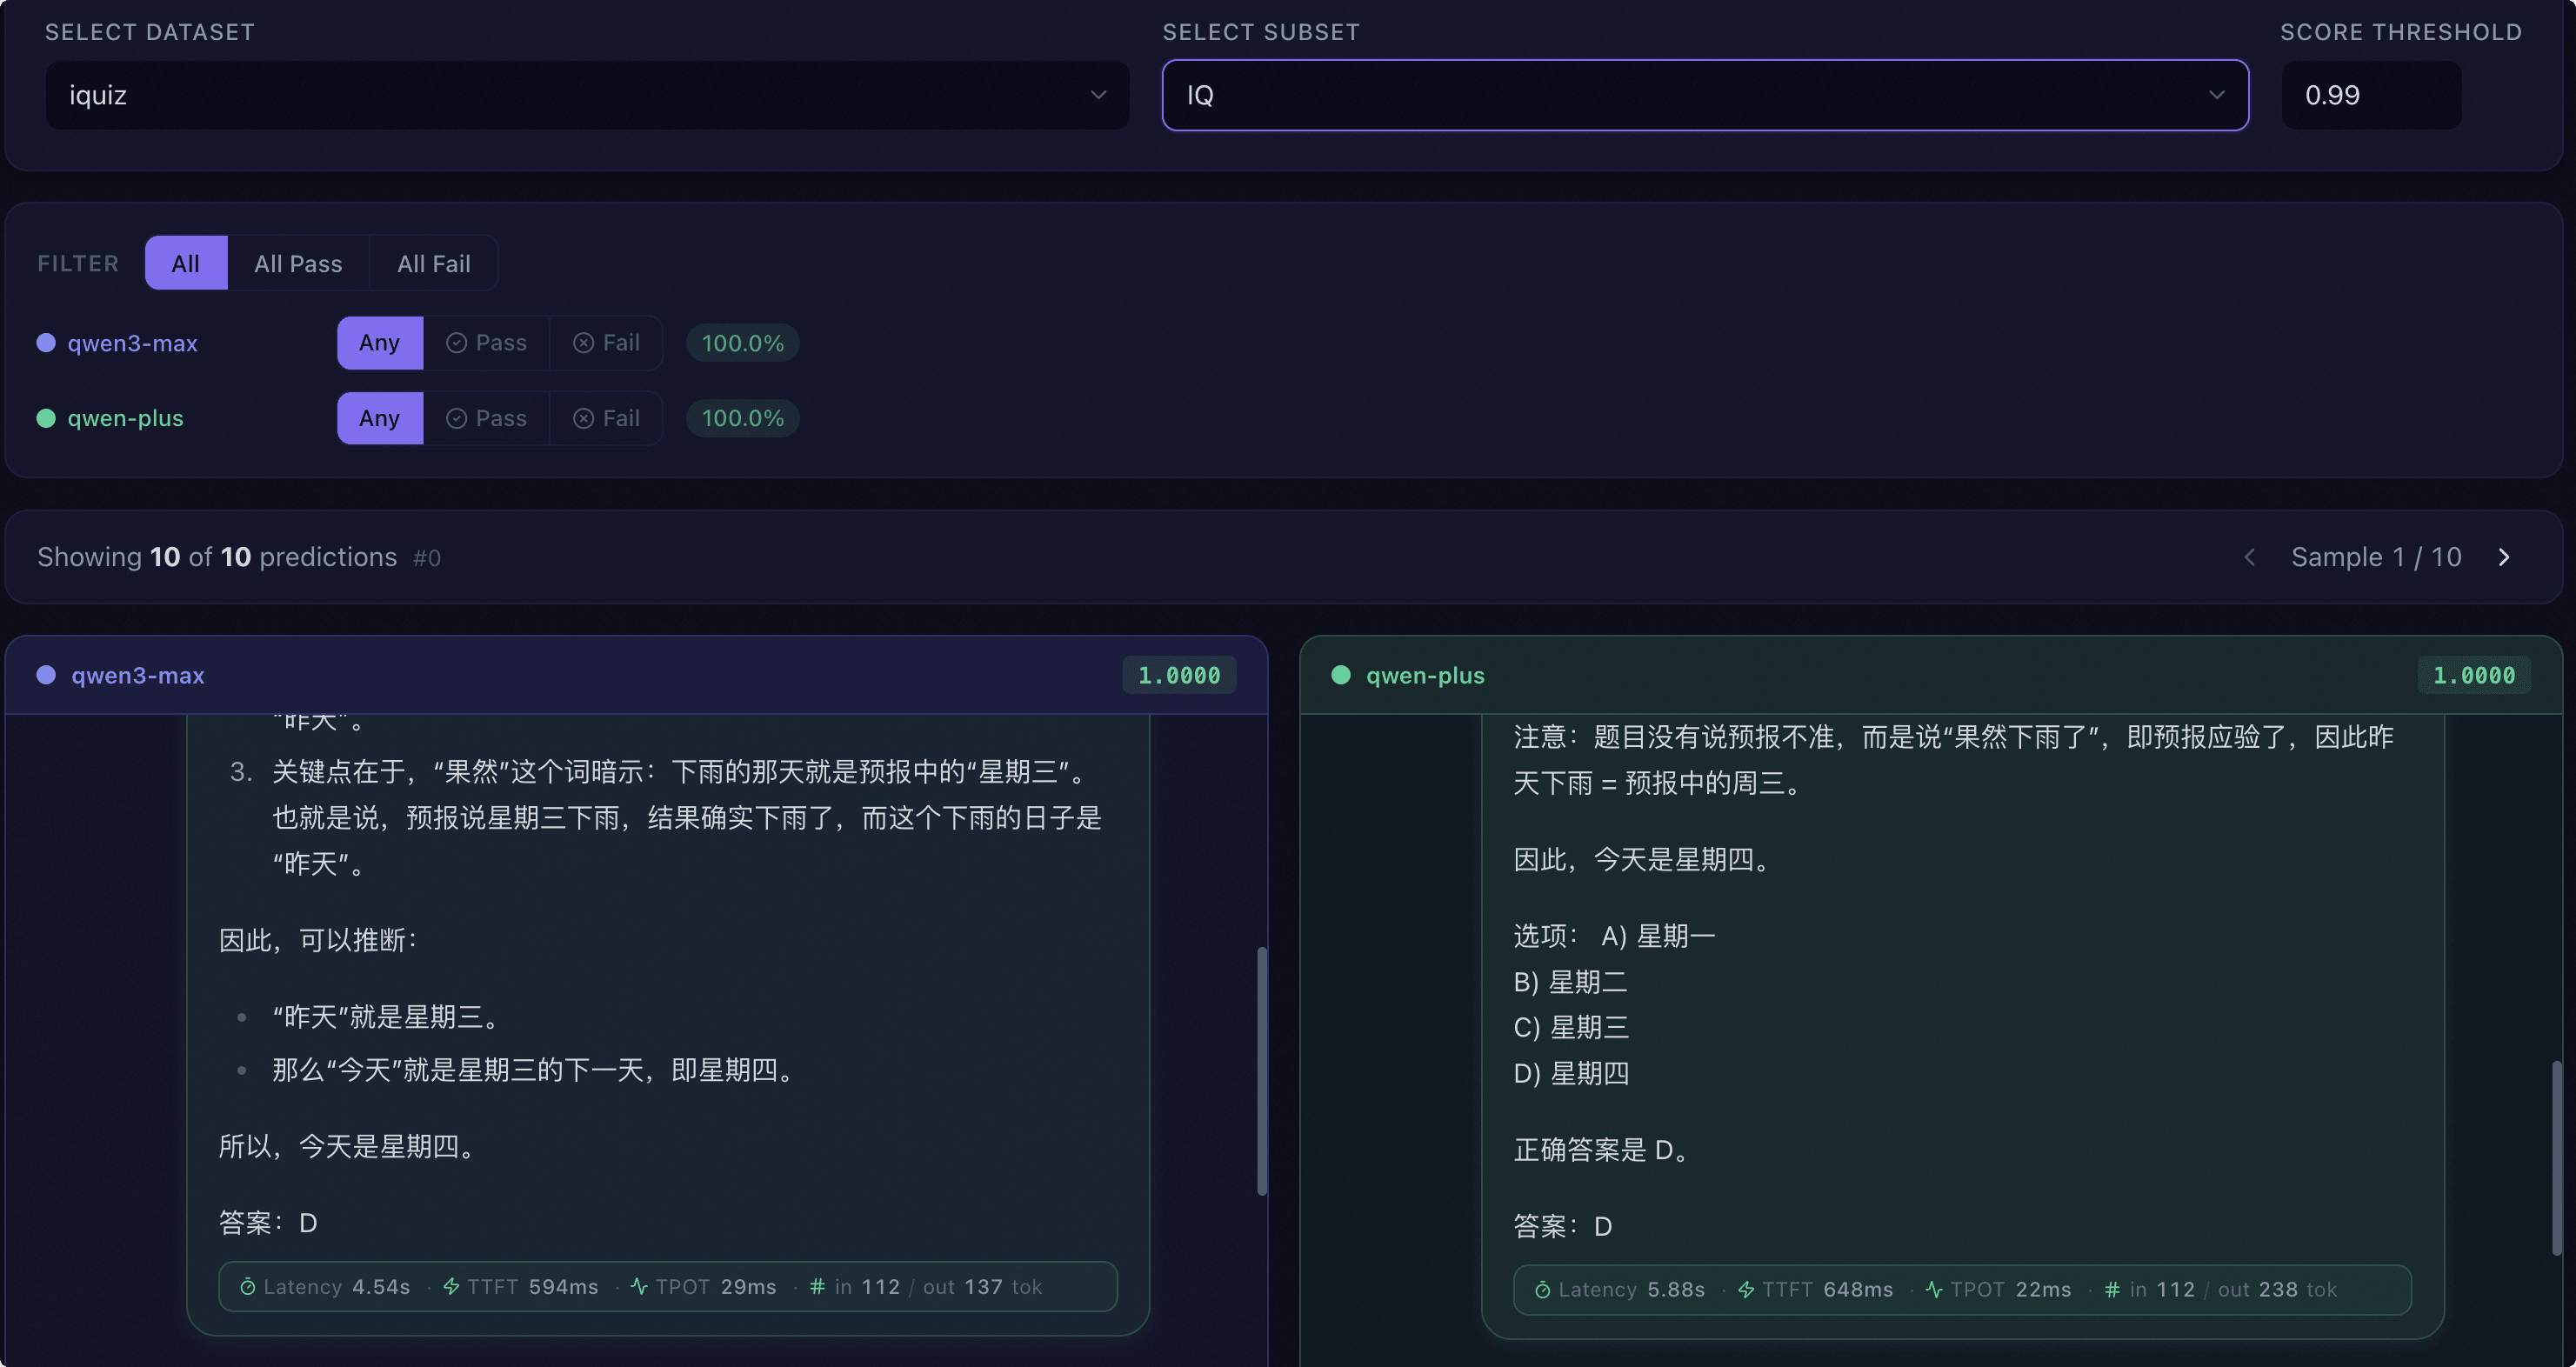
Dataset and Subset Selection: Select common datasets and subsets for sample-by-sample comparison.
Score Threshold: Set the pass/fail threshold.
Filter by Model: Each model independently sets an Any / Pass / Fail three-state filter, supporting quick presets like All Pass, All Fail, etc.
Pass Rate Tag: Each model displays the pass rate percentage under the current filter conditions.
Side-by-Side Conversation View: Displays prediction results for each model on the same question in a multi-column layout side by side, with each column identified by a different color and the model name and score displayed at the top. Supports keyboard arrow key pagination.
Statistics Bar: Displays the number of filtered samples and total samples, and provides pagination controls.
Model Management#
The model management area at the top of the comparison page supports the following actions:
View Selected Models: Displays the models currently participating in the comparison as tags.
Remove Model: Click the remove button on the tag to remove a model (at least 2 must be kept).
Add Model: Click the add button and enter a report name to add a new model (up to 3).
Benchmark Browser#
The benchmark page provides browsing and search functionality for all evaluation datasets supported by EvalScope.
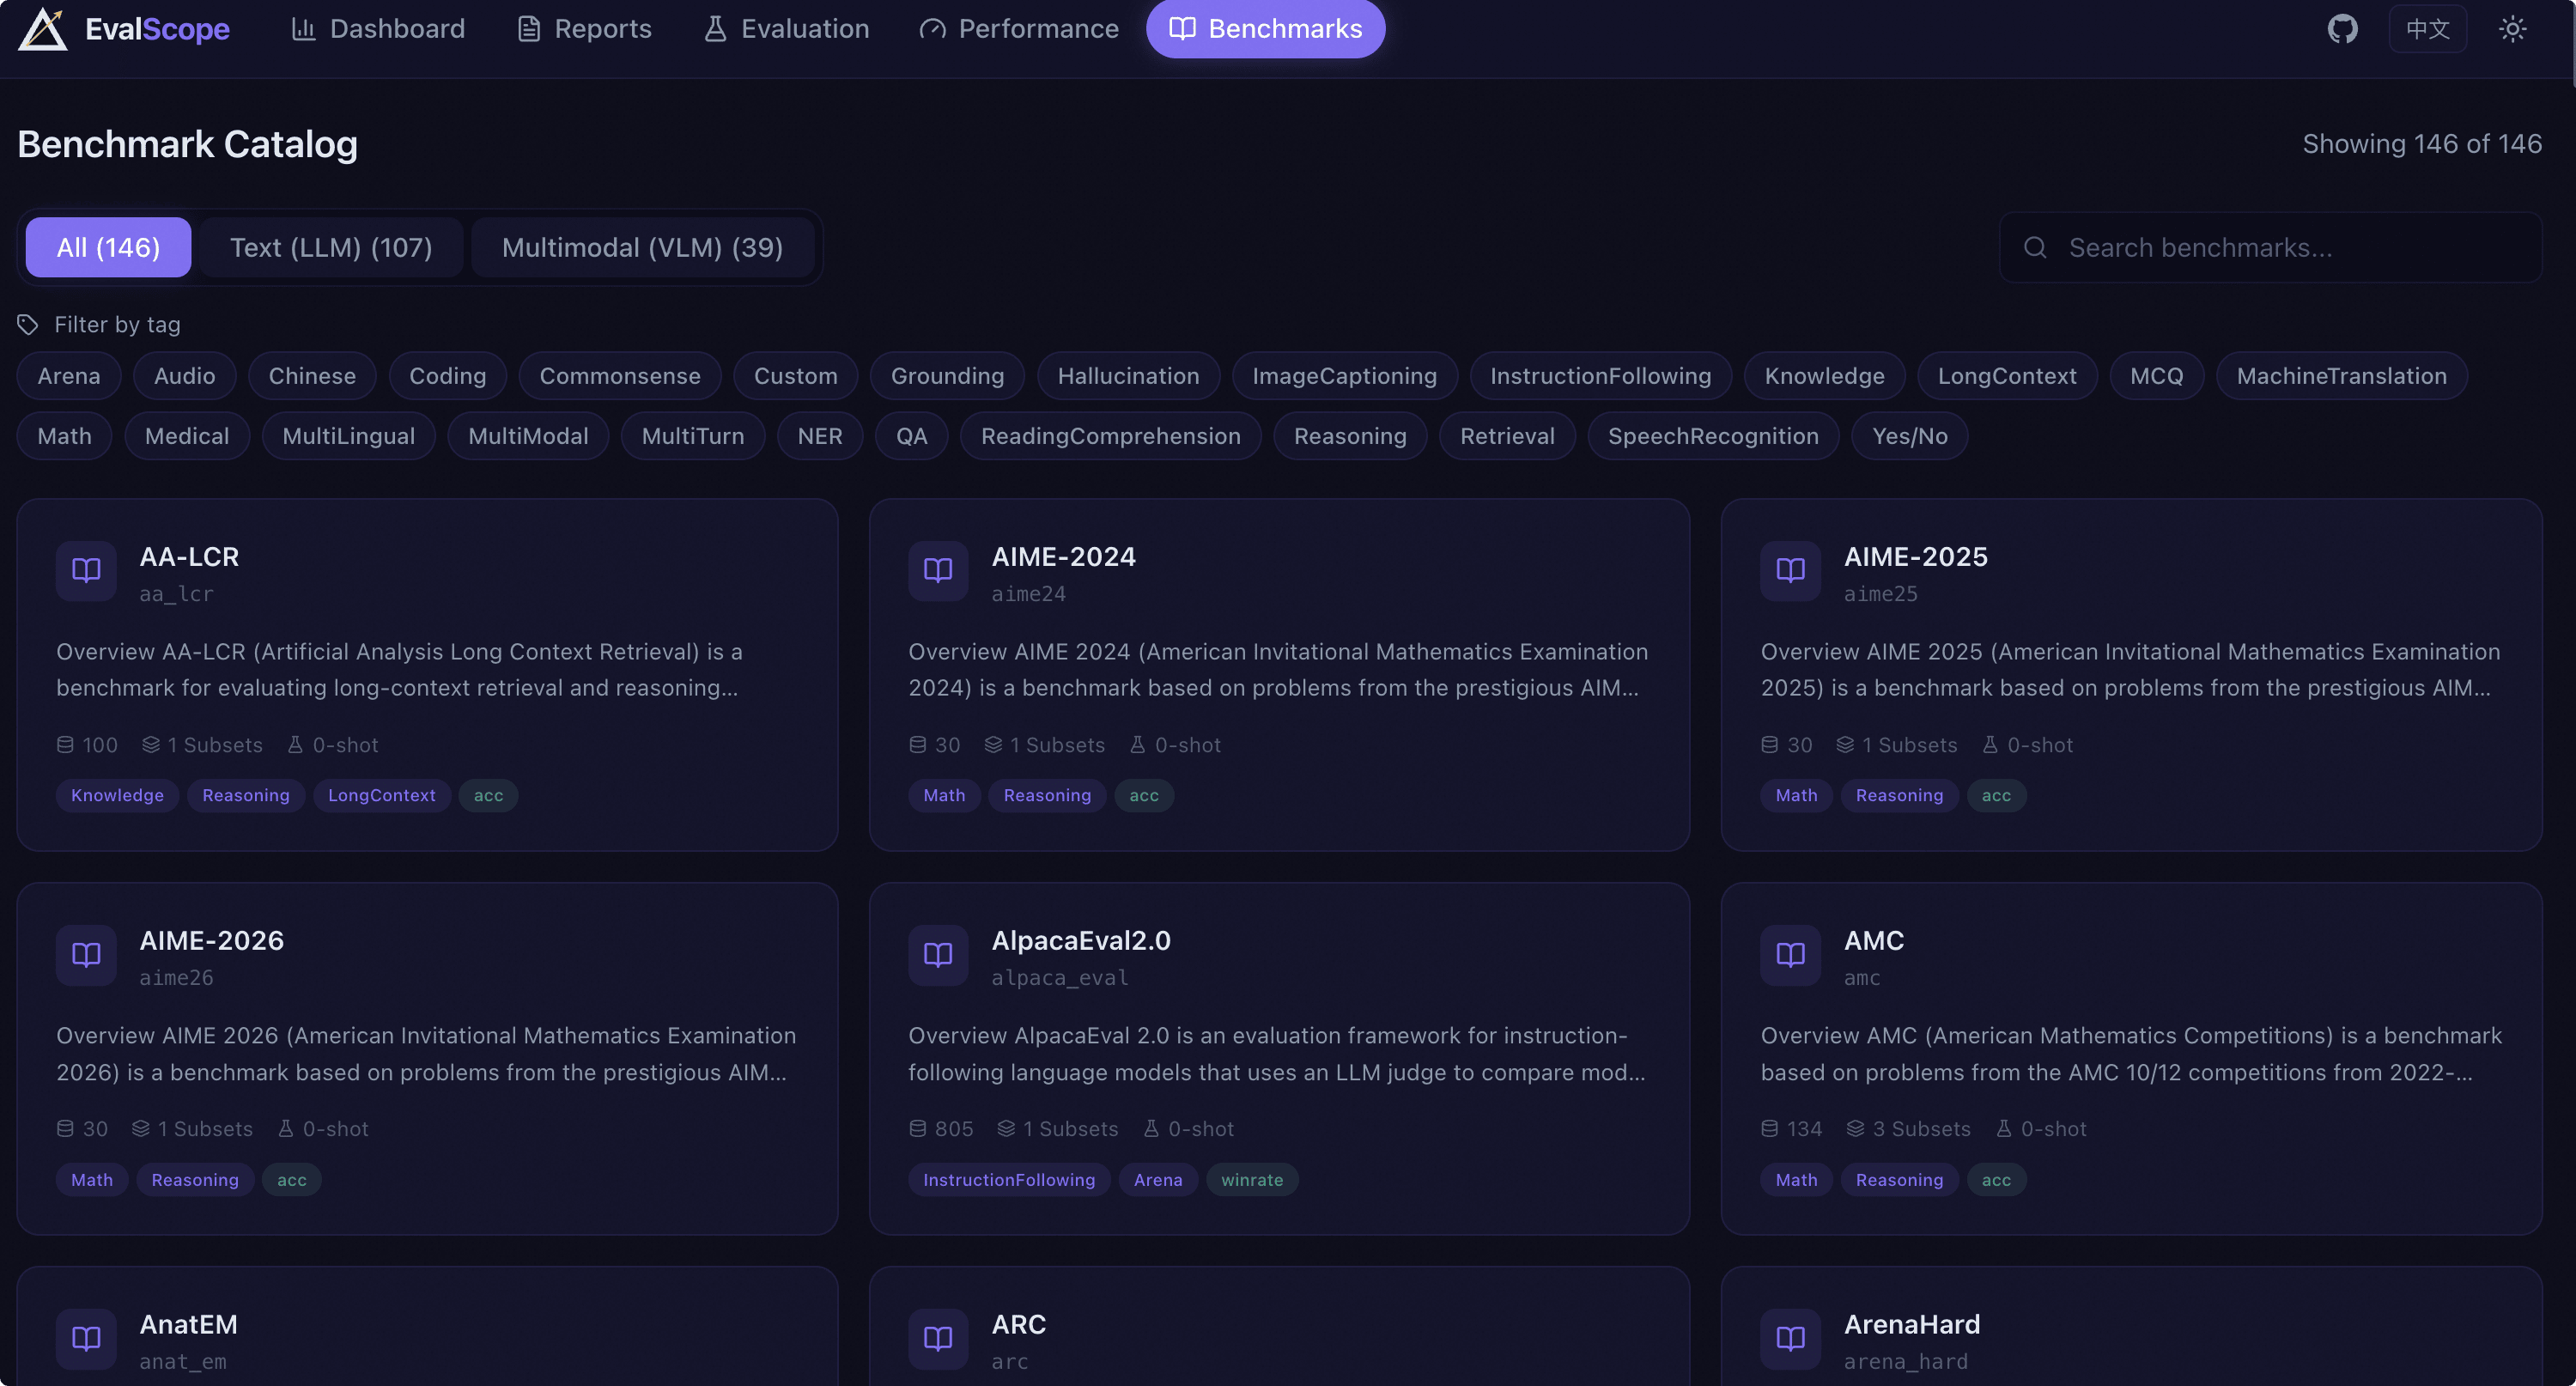
Category Tabs: Switch between All / Text / Multimodal tabs to view text or multimodal datasets.
Keyword Search: Search datasets by name or description.
Tag Filter: Click tag buttons to filter datasets by capability dimension (e.g., math, reasoning, code, etc.).
Dataset Cards: Each card displays the dataset name, identifier, description summary, sample count, subset count, few-shot count, tags, and metrics.
Details Modal: Click a card to open a modal window displaying the dataset’s complete Markdown description, paper links, and other detailed information.
Online Evaluation and Stress Test#
The web interface supports directly submitting evaluation and stress test tasks without command-line operations.
Evaluation Task#
The evaluation task page provides a configuration form and task monitoring panel:
Configuration Form: Fill in the model, dataset, generation parameters, and other evaluation configurations, then submit the task.
Task Monitoring: Displays the task progress bar and running logs in real time. After the task is completed, you can directly view the evaluation report.
Stress Test Task#
The stress test task page provides a configuration form and task monitoring panel:
Configuration Form: Fill in the model connection information and stress test parameters, then submit the task.
Task Monitoring: Displays the stress test progress and logs in real time. After the task is completed, you can directly view the stress test report.
Note
For detailed configuration instructions on online evaluation and stress test features, please refer to Evaluation Quick Start and Stress Test Quick Start.